After I installed FHEM for the first time and the configuration page was actually accessible, the euphoria was great. After I clicked around for a bit, this euphoria was quickly replaced by helplessness. FHEM is a powerful and very well maintained tool for connecting various home automation devices. Unfortunately there's just one thing it's not: intuitive.
In my opinion, this is the only disadvantage of FHEM or open source projects in general: you have to invest time and deal with the project. Unfortunately, it's often not something that can be put together or clicked together in one evening using plug and play.
That's why I've decided to summarize and explain the most important basics about FHEM in this article.
Ideally, you will be able to set up a functional and secure FHEM configuration without having to spend days slogging through forum posts and wiki pages.
I will first write a bit about the structure and configuration of FHEM and then present a few useful (and sometimes important) configuration snippets.
Safety instructions
I know the following notes are always kind of annoying and seem unnecessary. Unfortunately, many people who knew "better" have lost eyes, fingers or other things due to carelessness or injured themselves. Data loss is almost negligible in comparison, but even these can be really annoying. Therefore, please take five minutes to read the safety instructions. Because even the coolest project is not worth injury or other trouble.
https://www.nerdiy.de/sicherheitshinweise/
Affiliate links/advertising links
The links to online shops listed here are so-called affiliate links. If you click on such an affiliate link and make a purchase via this link, Nerdiy.de will receive a commission from the relevant online shop or provider. The price does not change for you. If you make your purchases via these links, you support Nerdiy.de in being able to offer other useful projects in the future. 🙂
Requirements
Before you start with this article you should have prepared the RaspberryPi so that it is accessible via the network and controllable via SSH.
The following three articles describe what needs to be done to prepare the RaspberryPi:
RaspberryPi – setup for nerdiys!
RaspberryPi – The first configuration!
RaspberryPi – Control the RaspberryPi via SSH
FHEM – Installation on the RaspberryPi
Tools needed:
-no-
Materials needed:
In the following list you will find all the parts you need to implement this article.
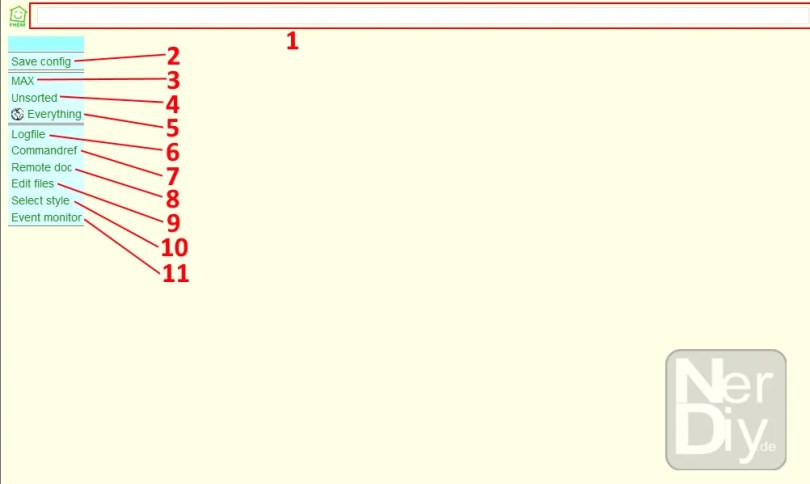
Overview of the FHEM web interface
The following images are intended to give you a brief overview of the various functions of the FHEM web interface.
1. The command line:
Here you can enter commands, for example to create or configure new modules
2. "Save config" basically does exactly what it says. All changes you make to your FHEM instance are saved in a large configuration file. However, this only happens after you have clicked the "Save config" button. Unsaved changes are indicated by a red question mark next to "Save config". Unsaved changes will be lost if the FHEM server is restarted.
3, 4 and 5 "MAX", "unsorted" and "Everything" are "rooms" that you can create to group your configured sensors and actuators. For example, you can also create a "Living room" room and group together all the devices that are important for controlling the living room. Only the "unsorted" and "Everything" rooms are created automatically and are always available. All configured modules that are not yet linked to any other room are listed in the "unsorted" room. All configured modules are listed in the "Everything" room, regardless of whether they are already linked to another room.
6. "Logfile" shows you the entries in the log file
7 "Commandref" shows you the local command library. Here you will find all available commands and sometimes more detailed information about them.
8 "Remote doc" is similar to "Commandred" except that you will be redirected to the latest version of the available commands on the FHEM website.
9 "Edit Files" allows you to edit the various style and configuration files of FHEM. You have a lot of options here, but you can also break a lot. Therefore, always work carefully here and preferably with a previous backup.
10. under "Select Style" you can change the appearance of your FHEM instance.
11 The "Event Monitor" allows you to display current live events. For example, events such as received switching commands are displayed.


Modules
The great thing about FHEM is that its functions can be expanded and refined using all sorts of modules. It is precisely this property that makes it so powerful, as it allows new sensors or actuators to be integrated into FHEM.
You can find a great overview of the structure of FHEM at https://wiki.fhem.de/wiki/System%C3%BCbersicht
Starting and stopping
To be able to start and stop Putty via the console, the following commands are helpful.
Starting FHEM:
sudo /etc/init.d/fhem start
or
systemctl start fhem.service

Stopping FHEM:
sudo /etc/init.d/fhem stop
or
systemctl stop fhem.service

View current status of FHEM
To display the current system messages from your FHEM instance, simply use the following command.
sudo /etc/init.d/fhemstatus
or
systemctl status fhem.service

Further information
https://wiki.fhem.de/wiki/System%C3%BCbersicht
Have fun with the project
I hope everything worked as described for you. If not or you have questions or suggestions please let me know in the comments. I will then add this to the article if necessary.
Ideas for new projects are always welcome. 🙂
PS Many of these projects - especially the hardware projects - cost a lot of time and money. Of course I do this because I enjoy it, but if you think it's cool that I share the information with you, I would be happy about a small donation to the coffee fund. 🙂


