

The APDS-9960 is a sensor that can be connected to a microcontroller such as the ESP8266 via the I2C bus.
With the help of the sensor it is possible to recognize simple gestures, measure the brightness, the distance of an object to the sensor and the color of the light hitting the sensor.
Integration into ESPEasy is quite easy thanks to the appropriate plugin.
The necessary steps to integrate the APDS-9960 into your ESPEasy instance are described in the following article.
Safety instructions
I know the following notes are always kind of annoying and seem unnecessary. Unfortunately, many people who knew "better" have lost eyes, fingers or other things due to carelessness or injured themselves. Data loss is almost negligible in comparison, but even these can be really annoying. Therefore, please take five minutes to read the safety instructions. Because even the coolest project is not worth injury or other trouble.
https://www.nerdiy.de/sicherheitshinweise/
Affiliate links/advertising links
The links to online shops listed here are so-called affiliate links. If you click on such an affiliate link and make a purchase via this link, Nerdiy.de will receive a commission from the relevant online shop or provider. The price does not change for you. If you make your purchases via these links, you support Nerdiy.de in being able to offer other useful projects in the future. 🙂
Requirements
Helpful articles:
Additional tips on ESPEasy can be found in the following articles.
- ESPEasy - Execute commands and actions via HTTP, MQTT, UDP and directly
- ESPEasy - Compile firmware, flash and configure WLAN access data
- ESPEasy / Wemos D1 Mini - Adapt ADC to other maximum voltages
Required tool:
Required material:
Connect the APDS-9960 to the ESP8266
The APDS-9960 is connected to the ESP8266 or Wemos D1 Mini via the I2C bus.
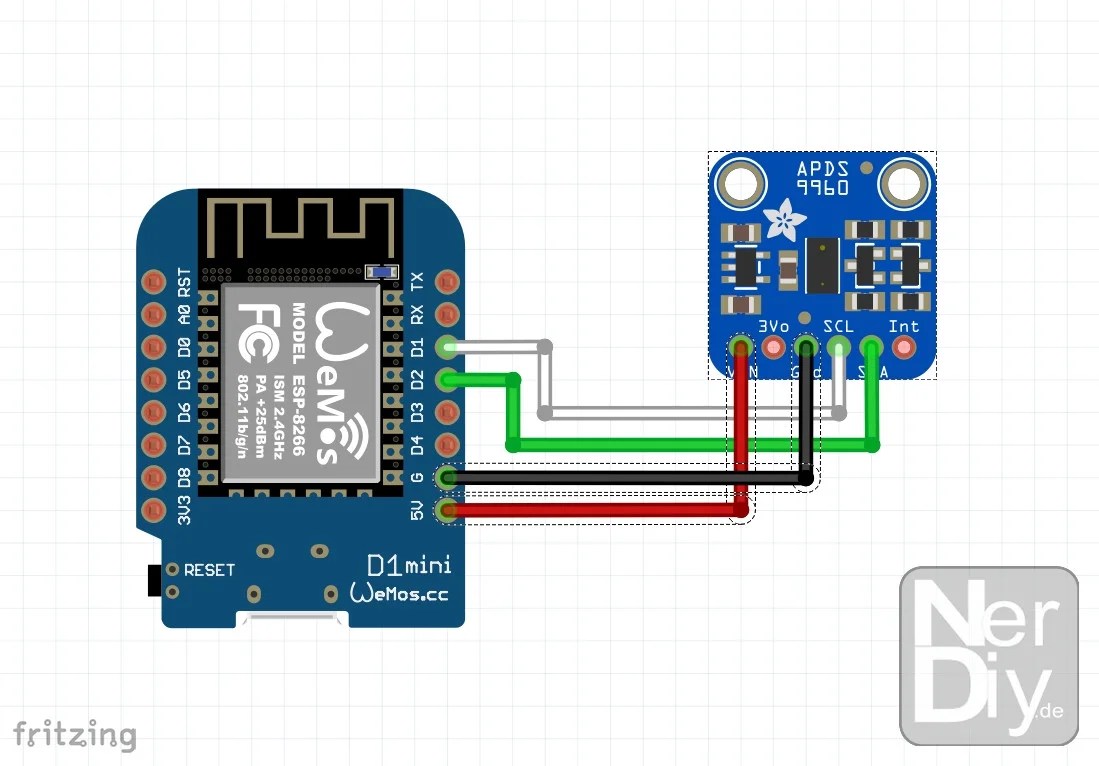
If the I2C bus is configured by default, you can use the shown schematic as orientation.
Configuration of the APDS-9960 in ESPEasy
In order for the APDS-9960 to be configured in ESPEasy, the ESPEasy firmware should already be installed and accessible on the ESP8266 or ESP32. You can also find information about this in the article ESPEasy - Compile firmware, flash and configure WLAN access data.

First open the configuration website of your ESP8266 programmed with ESPEasy by entering its IP address into your web browser. Information on how to find out the IP address can also be found in the article Display/find out the IP address of the devices in the network summarized.
As soon as you have opened the configuration website, you must switch to the "Devices" tab. To do this, click on the "Devices" button.

In the "Devices" tab, click on the "Add" button in one of the empty rows.

You will then be automatically redirected to the featured view and...

...can select here which device you want to create.
Selects here the entry
- Gesture – APDS9960 [DEVELOPMENT]
off.
If the entry you are looking for is not visible, the plugin is not included in your ESPEasy installation. A precompiled binary which also contains this plugin can be found at the following link.

This will redirect you back to an overview page.
Here you can make all settings regarding the APDS-9960.
If you have used the circuit diagram shown above, you can use the settings shown.
It is important that you check “Force Slow I2C Speed”.
You also have to set in the “Plugin Mode” section whether the sensor should measure gestures, proximity and brightness values or the RGB color values of the incident light.

For RGB color measurement, the APDS-9960 must be configured as shown on the left.

To measure the gesture, proximity and brightness values, the APDS-9960 must be configured as shown here.

View of other settings in mode for measuring gesture, proximity and brightness values.
To apply the settings, click “Submit”.

View of the additional settings in the RGB color measurement mode
To apply the settings, click “Submit”.
Display measured values from the APDS-9960
After you have configured the APDS-9960 you can test it directly.

In the overview of the configured devices, the measured values can be seen in the line of the APDS-9960 on the right.
These update themselves at least every 60 seconds. This interval can be set in the APDS-9960 configuration in the “Interval” section.

If you have previously configured the APDS-9960 to measure RGB color values, the view will look as shown on the left.
Use APDS-9960 brightness value using Rules
If you use the APDS-9960 in mode for measuring gesture, proximity and brightness values, you can also use the measured brightness value to, for example, automatically adjust the brightness of a lamp to the ambient brightness. This is also practical for adjusting display brightness, as the display is not too bright when the ambient light is dark and not too dark when the ambient light is bright.
An example of how to automatically use the brightness value measured by the APDS-9960 can be found in the following rules. The example shown causes the brightness of the LEDs to vary pxlBlck plugin are controlled and automatically adjusted to the ambient brightness.
On gesture#Light do pbbr,0,[gesture#Light],1,1,15, endonSend sensor data via MQTT
You can now also send the collected sensor data to your SmartHome via MQTT and process it there if necessary. What you need to configure for this is described in the following article.
Additional sensors for connection to the ESP8266 / ESP32
An overview of other articles for connecting sensors and actuators to ESPEasy can be found in the following category.
Have fun with the project
I hope everything worked as described for you. If not or you have questions or suggestions please let me know in the comments. I will then add this to the article if necessary.
Ideas for new projects are always welcome. 🙂
PS Many of these projects - especially the hardware projects - cost a lot of time and money. Of course I do this because I enjoy it, but if you think it's cool that I share the information with you, I would be happy about a small donation to the coffee fund. 🙂
![]()
![]()