What I really appreciate about Spotify is its good connectivity. You can play or control music or podcasts on another device with just a few clicks.
Thanks to the free option of setting up developer access, you can also access many of these functions from NodeRed. With a few cleverly linked nodes, you can easily create your own "Spotify remote control" for (for example) the dashboard.
Of course, the control options are not limited to the dashboard. For example, you could also trigger the control option via connected buttons or other options. 🙂
You can find an initial approach to this in the following article.
Requirements
Helpful articles:
So that you can install new nodes, NodeRed should of course already be installed.
How to prepare a RaspberryPi and then install NodeRed on it is described in the following articles.
The following three articles describe what needs to be done to prepare the RaspberryPi:
- RaspberryPi – setup for nerdiys!
- RaspberryPi – The first configuration!
- RaspberryPi – Control the RaspberryPi via SSH
- NodeRed – Installing NodeRed on the RaspberryPi
Required tool:
-no-
Required material:
In the following list you will find all the parts you need to implement this article.
Log into the NodeRed configuration interface
Before you can edit your NodeRed configuration, you must - if activated - first log into the NodeRed configuration interface.

thanksgiving
First of all, thank you gelo2002 for his flow. The NodeCode offered below is based on its freely shared code. I just added a few (in my opinion useful) extensions. But gelo2002 did the main work. 🙂
You can find information about his flow here:
https://gist.github.com/gelo2002/1727790dfc3f6bac8c5b39f5a952b804
or here
https://flows.nodered.org/flow/1727790dfc3f6bac8c5b39f5a952b804
Activate Spotify Devloper account
In order for you to be able to control the various functions of your Spotify account, you must first set up a developer account for your Spotify account. This costs nothing and can be done with just a few clicks. 🙂

To do this, go to the homepage of your Spotify Developer Portal. You can do this using the following link:

After logging in with your account data, you must first accept or confirm the "Terms and Conditions".

...and enter a name and a suitable description. You can choose both as you like, but of course they should be reasonably meaningful. 🙂

You will then be redirected to the overview of this "app" (this is what Spotify calls the developer accounts that have been set up). There you will find the "ClientID" and the "ClientSecret" on the left-hand side. You will need both of these later, so make a note of them now.

After you have clicked on "Edit Settings" in the overview, you will be directed to the view shown. There you must now enter the appropriate "Redirect Uri". This redirect uri depends on the address of your NodeRed server.
For example, this is at the address https://server.fritz.box reachable, the redirect Uri would be as follows:
https://server.fritz.box:1880/spotify-credentials/auth/callback
Make sure that you select the correct protocol (i.e. http or https).

Once you have entered the correct link, all you have to do is click on "Add" and (further down) on "Save".
Insert NodeCode
Now to the actual NodeCode. This contains the control of the simplest functions in the form shown below. You can pause and resume playback, select the next or previous track, "scroll" through the song and the album cover is also displayed.
As always, you can find the NodeCode in the following part and also in the Nerdiy Git repository at:


Enter account access data in NodeRed
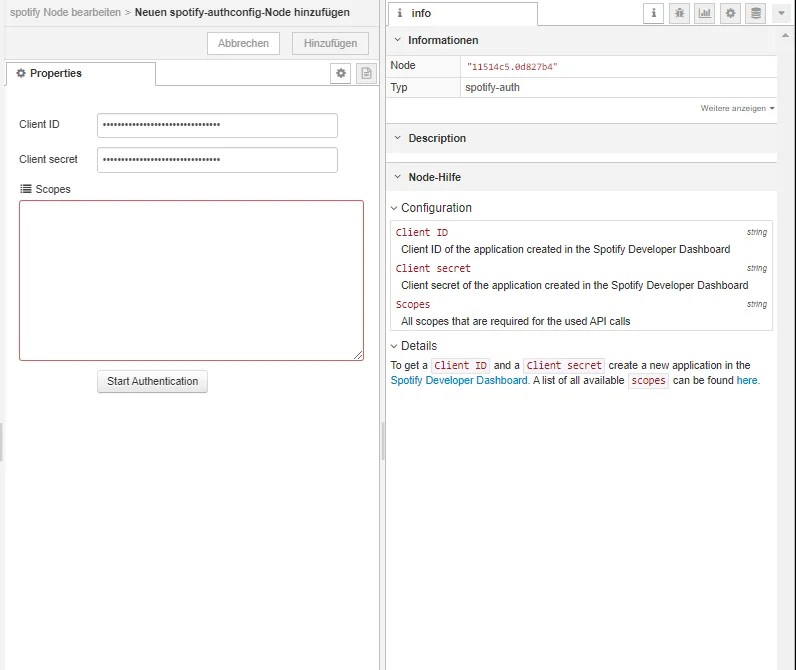
After you have created developer access to your Spotify and inserted the NodeCode, you can now switch to your NodeRed configuration. Click on one of the Spotify nodes and start configuring a new access there.

Now you have to enter your ClientID in the text field next to "ClientID" and your Client secret in the text field next to "Client secret".
You can find both in the previous step in your Spotify Developer access.

Next, you must enter the desired "Scopes". Scopes stand for the services that you want to control from NodeRed.
For this flow you can enter the following scopes:
streaming user-follow-modify user-read-currently-playing user-modify-playback-state
You can find a complete list at: https://developer.spotify.com/documentation/general/guides/authorization/scopes/

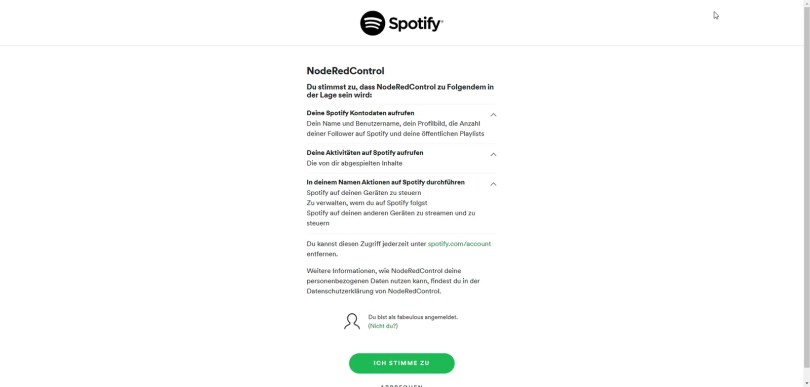
This will open a new window in which you will now have to confirm that you allow your NodeRed to access your Spotify account.
If you receive an error message at this point, you can find a solution in the paragraph "Solution for error "INVALID_CLIENT: Invalid redirect URI"" 🙂

After you have confirmed this, you will be redirected to a website where only the short message "spotify: authorized" is displayed.
Solution for error "INVALID_CLIENT: Invalid redirect URI"
I found the solution to the error message: INVALID_CLIENT: Invalid redirect URI here: https://github.com/pckhib/node-red-contrib-spotify/issues/16
In principle, the error is caused by the fact that the "Redirect URI" was not configured correctly in the developer account. To get the correct redirect URI, you can use the following trick.

Enter your URI into the URL decoder (https://www.urldecoder.org/) and let it decode.
The marked part in the lower field then corresponds to the redirect URI, which you must enter in your Spotify account.
Spotify playback sometimes jumps or stalls
Every now and then it happens that the playback on one of my devices (no matter which one) jumps or stalls. Through testing, I found out that this seems to be related to the linking of the Spotify account with external services (for example the NodeCode presented here).
In retrospect, I explain it like this: Because Spotify wants to keep the playback data synchronized on all connected participants, I can imagine that a participant who responds too slowly could disrupt this synchronization.
Long story short: If you are also experiencing this error: For me, it helped to restart the computer on which NodeRed is running or, in the "worst case", to unlink the Spotify account.
Have fun with the project
I hope everything worked as described for you. If not or you have questions or suggestions please let me know in the comments. I will then add this to the article if necessary.
Ideas for new projects are always welcome. 🙂
PS Many of these projects - especially the hardware projects - cost a lot of time and money. Of course I do this because I enjoy it, but if you think it's cool that I share the information with you, I would be happy about a small donation to the coffee fund. 🙂


Did you get Playback Transfer to another device working? In the penultimate version, you simply stupidly sent the device ID and play command to the TransferMyPlayback API - now nothing happens there.
Hey Steven,
I haven't actually tried it yet. Have you checked the Spotify API to see if there is any information about it?
Best regards
Fabian
Hi Fab,
I was wondering how you select a playlist or song to begin with? I'm a bit confused about this. It seems like you have somehow already configured the spotify node to get a playlist/song.
Hi Asad,
currently I use this only to display information of the current playing song. Selecting the song and co is done via the smartphone/desktop app of spotify. Nevertheless it is also possible to do this via the spotify node. 🙂
Best regards
Fab
Thank you for your response. I'm a bit confused as to how you would enable that. There doesn't seem to be a specific way to do this. Do you have a tutorial that selects the song via the spotify node?
thanks,
Asad
Hi Asad,
unfortunately not (yet). But I will put it on my list and will try to prepare something like this soon. 🙂
Best regards
Fab
Thanks for letting me know.