In the article RaspberryPi - Install MQTT Server on the RaspberryPi I had written a little about MQTT and explained how to install an own MQTT server on the RaspberryPi.
In order to be able to use an MQTT server from FHEM, you have to install a few FHEM modules. How to do that and what you have to pay attention to I have described in the following article.
Overview
Before you can start installing the MQTT module, you should have prepared the Raspberry Pi so that FHEM can be installed on it and configured via the web menu.
The following three articles describe what needs to be done to prepare the RaspberryPi:
RaspberryPi – setup for nerdiys!
RaspberryPI - The First Configuration!
RaspberryPi – Control the RaspberryPi via SSH
FHEM – Installation on the RaspberryPi
RaspberryPi - Install MQTT Server on the RaspberryPi
Required tool:
-no-
Required material:
In the following list you will find all the parts you need to implement this article.
Log in to the RaspberryPi via SSH
To start, you must first log in to the Rasp Pi with Putty via SSH. How to do this is in the article RaspberryPi - Control the RaspberryPi via SSH described.

Update package management
The package management in Linux is a "central place" through which various software packages can be installed. In order for this to work reliably, the lists and sources of the package management should be updated before each installation of new packages.

sudo apt-get update && sudo apt-get upgrade


Install Perl MQTT packages
In order for FHEM to communicate with the MQTT server, two Perl packages must be installed.
To do this, you have to log in to the RasPi with Putty and enter the following commands:
sudo cpan install Net::MQTT:Simple sudo cpan install Net::MQTT:Constants
The question "Would you like to configure as much as possible automatically? [yes]" you confirm with "yes" and Enter.

Restart FHEM
In order for the newly installed packages to be recognized by FHEM, FHEM must be restarted once. To do this you have to enter the following two commands one after the other. This will first stop the server and then start it again. You can also find further information about stopping and starting in the article FHEM - Structure, modules & interesting facts
sudo /etc/init.d/fhem stop sudo /etc/init.d/fhem start
Define MQTT clients
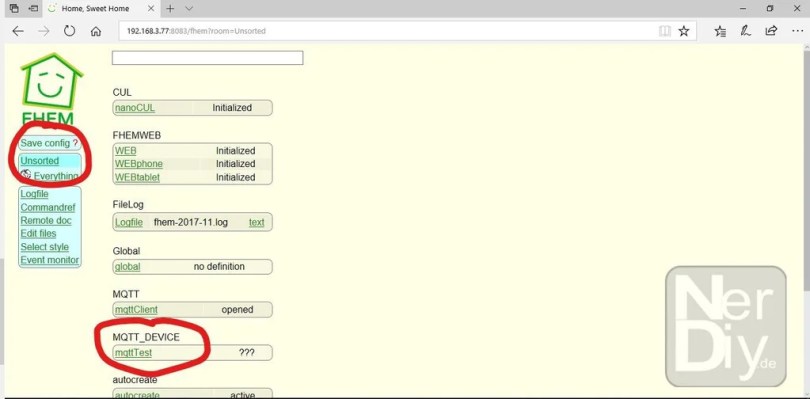
In order for you to be able to send and receive data via FHEM MQTT, FHEM must register as a client with the MQTT server. You only have to create this client once. All sensors or actuators registered in FHEM will later be supplied with data via this client or can send their data via it.
In order to register the MQTT client in FHEM you have to switch to the FHEM web interface.
There is an input field at the top where we can enter the definition of the MQTT client.
The definition is (for example):
define mqttClient MQTT 127.0.0.1:1883
The command created the MQTT client in FHEM. But it can't do much yet.
To test the function we create an MQTT_ DEVICE. This module can be used to subscribe to MQTT topics in FHEM and also publish data.
The definition of our small test module is:
define mqttTest MQTT_DEVICE; attr mqttTest subscribeReading_testTopic testTopic; attr mqttTest publishSet_testTopic testTopic;


Send test message and check reception


You have now made your FHEM installation MQTT capable.
Have fun with the project
I hope everything worked as described for you. If not or you have questions or suggestions please let me know in the comments. I will then add this to the article if necessary.
Ideas for new projects are always welcome. 🙂
PS Many of these projects - especially the hardware projects - cost a lot of time and money. Of course I do this because I enjoy it, but if you think it's cool that I share the information with you, I would be happy about a small donation to the coffee fund. 🙂


