

Normally, all data on a Raspberry Pi is located on the inserted SD card. This has the advantage that you can simply insert a ready-to-use SD card into another Raspberry Pi. If, for example, your Raspberry Pi is damaged, all you have to do is insert the SD card into workable hardware and you can continue.
But what if you want to clearly identify the hardware used - i.e. the mainboard or the hardware of the Raspberry Pi? A serial number would be very helpful.
Unfortunately there is no special serial number for the Raspberry Pi hardware. But what can be read is the serial number of the CPU. And since this is permanently soldered to the rest of the hardware and is very difficult or impossible to replace for most people, it can be used as a serial number to identify the Raspberry Pi board.
How you can read the serial number of your Raspberry Pi or its CPU is described in the following article.
Safety instructions
I know the following notes are always kind of annoying and seem unnecessary. Unfortunately, many people who knew "better" have lost eyes, fingers or other things due to carelessness or injured themselves. Data loss is almost negligible in comparison, but even these can be really annoying. Therefore, please take five minutes to read the safety instructions. Because even the coolest project is not worth injury or other trouble.
https://www.nerdiy.de/sicherheitshinweise/
Affiliate links/advertising links
The links to online shops listed here are so-called affiliate links. If you click on such an affiliate link and make a purchase via this link, Nerdiy.de will receive a commission from the relevant online shop or provider. The price does not change for you. If you make your purchases via these links, you support Nerdiy.de in being able to offer other useful projects in the future. 🙂
Requirements
Helpful articles:
Before you start with this article, you should have prepared a Raspberry Pi so that it can be accessed via the network and controlled via SSH.
The following articles describe what needs to be done to prepare the Raspberry Pi.
- RaspberryPi – setup for nerdiys!
- RaspberryPi – The first configuration!
- RaspberryPi – Control the RaspberryPi via SSH
In the following lists you will find all the parts you need to implement this article.
Required tool:
| Number | Link |
|---|---|
| 1x | No products found. No products found. |
| 1x | No products found. No products found. |
Required material:
| Number | Link |
|---|---|
| 1x | No products found. No products found. |
| 1x | No products found. No products found. |
| 1x | No products found. No products found. |
| 1x | No products found. No products found. |
Log in to the RaspberryPi via SSH
To start, you must first log in to the Rasp Pi with Putty via SSH. How to do this is in the article RaspberryPi - Control the RaspberryPi via SSH described.

Read out the ID or serial number of the CPU of the Raspberry Pi
The CPU serial number is included in the information about the CPU. These can be read very easily with the following command.
So just give the command:
cat /proc/cpuinfo
into the console of the Raspberry Pi.
You will then be shown the following information about the Raspberry Pi's CPU.

With this command you can get all the information about the CPU including the serial number. But what if you just want to see the serial number?

To only get the serial number, you can combine a few commands.
For example, enter the following command.
cat /proc/cpuinfo | grepSerial | cut -d ":" -f2
The CPU information is thereby retrieved, the serial number is filtered out and output.
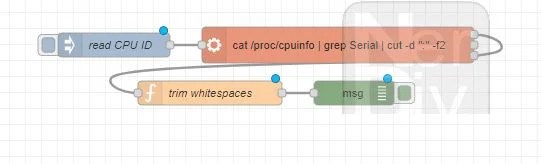
Read out the ID or serial number of the Raspberry Pi with Node Red
With Node Red you can automate the retrieval of the serial number and then process it directly.
For example, you could use the serial number to uniquely identify each Raspberry Pi using Node Red.
You can find the Node Red code in the Nerdiy Git repository at the following link:
How you can import this into your Nod eRed environment is in the article NodeRed - import and export node code described.
More articles on the topic
In the following categories you will find further links on the subject of Rasperry PI and Node Red.
Have fun with the project
I hope everything worked as described for you. If not or you have questions or suggestions please let me know in the comments. I will then add this to the article if necessary.
Ideas for new projects are always welcome. 🙂
PS Many of these projects - especially the hardware projects - cost a lot of time and money. Of course I do this because I enjoy it, but if you think it's cool that I share the information with you, I would be happy about a small donation to the coffee fund. 🙂
![]()
![]()